So you’ve just purchased a brand new mandoline slicer and you’re excited to start using it in your kitchen. However, the thought of operating this sharp instrument might make you a little nervous. Fear not! This beginner’s guide will walk you through the basic techniques and safety precautions needed to master the art of slicing and dicing with a mandoline slicer. From adjusting the thickness settings to selecting the right vegetables, you’ll soon be slicing like a pro. Get ready to elevate your cooking game with this handy kitchen tool!
What is a Mandoline Slicer
Definition
A mandoline slicer is a kitchen tool used for slicing fruits, vegetables, and other food items into consistent and uniform slices. It consists of a flat platform with an adjustable blade and a handguard or food holder to guide and protect your hands during slicing. The word “mandoline” is derived from the French word for “musicial instrument,” due to the similar appearance of the slicing mechanism to the strings and keys of a musical instrument.
Functionality
The primary function of a mandoline slicer is to quickly and efficiently slice various foods with precision and consistency. Unlike using a knife, which requires skill and practice to achieve evenly sliced pieces, a mandoline slicer allows you to effortlessly create uniform slices that are ideal for recipes where consistent thickness is important, such as potato gratin or cucumber salad. Additionally, a mandoline slicer can save you time in the kitchen, as it can slice a large quantity of food in a short amount of time.
Types of Mandoline Slicers
There are several types of mandoline slicers available on the market, each with its own features and benefits. The three most common types are:
Flat Slicers: These are the most basic type of mandoline slicers and are usually the most affordable option. They consist of a flat platform with an adjustable blade and a handguard. They are great for slicing fruits, vegetables, and hard cheeses.
V-Blade Slicers: V-blade slicers have a blade that is shaped like a V, which allows for more versatility when it comes to slicing different foods. The V-shape helps to cut through foods with less resistance and creates crinkle-cut or julienne slices. These slicers are ideal for creating waffle fries, zucchini chips, or carrot sticks.
Electric Slicers: Electric mandoline slicers automate the slicing process, making it even easier and quicker. They are equipped with a motor that moves the food across the blade, eliminating the need for manual effort. These slicers are perfect for those who frequently need to slice large quantities of food or have difficulty with manual slicing.
Choosing the Right Mandoline Slicer
Considerations
When choosing a mandoline slicer, there are several factors to consider:
Blade Quality: Look for a slicer with high-quality, sharp blades that can maintain their sharpness over time. Dull blades can lead to uneven slices and increase the risk of accidents.
Stability and Durability: Ensure that the slicer is stable and won’t slip or tip during use. A durable construction and strong materials will ensure that your slicer can withstand regular use.
Adjustability: Opt for a slicer that offers various slicing thickness options, as well as adjustable blades for different cuts like julienne or waffle cuts.
Ease of Cleaning: Consider the ease of cleaning the slicer, as some models may have detachable parts that can be washed separately, which can make the cleaning process easier.
Blade Options
Mandoline slicers come with different blade options to suit various slicing needs. Some common blade options include:
Straight Blade: The standard straight blade is perfect for slicing fruits, vegetables, and cheeses into thin, consistent slices.
Julienne Blade: A julienne blade is used for creating thin, matchstick-like strips of food. This blade option is great for preparing stir-fries or salads that require finely sliced ingredients.
Waffle Blade: If you enjoy crispy waffle fries or textured slices, a mandoline slicer with a waffle blade will allow you to achieve that unique pattern.
Safety Features
Safety should be a top priority when using a mandoline slicer. Look for slicers with the following safety features:
Handguard: A handguard or food holder is an essential safety feature that keeps your fingers away from the sharp blade. It provides a secure grip on the food item and allows you to slice it without putting your fingers at risk.
Non-slip Base: A non-slip base or rubber feet help to keep the slicer securely in place, reducing the risk of accidents caused by the slicer slipping or moving around during use.
Blade Guard: Some slicers come with blade guards for added protection. These guards cover the sharp edge of the blade when not in use, preventing accidental cuts.

Setting Up Your Mandoline Slicer
Preparing the Slicer
Before using your mandoline slicer, it’s important to set it up properly. Follow these steps to prepare your slicer:
Place the slicer on a stable surface, ensuring that it won’t move or slip during use.
Ensure that the blades are properly inserted and securely in place. Double-check that the blades are sharp and free from any debris or residue.
Familiarize yourself with the various adjustment knobs and levers on the slicer that control the thickness and cutting style.
Adjusting Thickness
Most mandoline slicers allow you to adjust the thickness of the slices. Follow these steps to adjust the thickness setting:
Locate the thickness adjustment knob or lever on your slicer. It is usually located on the side or front of the platform.
Turn the knob or move the lever to the desired thickness setting. Some slicers have numerical indicators, while others have specific thickness measurements.
Test the thickness settings by slicing a small piece of food and adjusting if necessary. It’s important to find the right thickness that suits your recipe and preferences.
Securing the Slicer
To ensure safe and accurate slicing, it’s crucial to secure the mandoline slicer in place. Follow these steps to secure your slicer:
If your slicer has a non-slip base or rubber feet, ensure that they are in contact with the surface and provide stability.
For added security, it’s recommended to place a damp towel or non-slip mat underneath the slicer. This will provide extra stability and prevent any movement during slicing.
If your slicer has a handguard or food holder, make sure it is securely attached and properly positioned. The handguard should be placed against the food item to guide it along the blade and protect your hands.
Basic Techniques and Tips
Grip and Pressure
When using a mandoline slicer, it’s important to maintain a proper grip and apply consistent pressure to ensure even and accurate slicing. Follow these tips for a secure grip and controlled pressure:
Hold the handguard or food holder firmly with your non-dominant hand. The handguard should be positioned on top of the food, applying downward pressure while keeping your fingers away from the blade.
Use your dominant hand to hold the food item you are slicing. Ensure a firm grip while keeping your fingers curled under and away from the blade.
Apply steady and even pressure while sliding the food item along the platform and against the blade. Avoid pushing or forcing the food through the slicer, as this can lead to uneven slices or accidents.
Hand Protection
Protecting your hands from accidental cuts is crucial when using a mandoline slicer. Follow these tips to ensure hand safety:
Always use the handguard or food holder provided with the slicer. This will keep your fingers away from the blade and provide a secure grip on the food item.
Avoid placing your hand directly on the food when slicing, as this increases the risk of accidental cuts. Instead, use the handguard to apply downward pressure and guide the food along the blade.
If you’re slicing smaller or irregularly shaped food items, consider using a cut-resistant glove on your non-dominant hand. This will provide an extra layer of protection against accidental cuts.
Slice Direction
Understanding the correct slice direction can make a significant difference in the quality of your slices. Follow these guidelines for optimal slice direction:
For most fruits and vegetables, start slicing from the stem or top end and work your way down towards the opposite end. This will ensure consistent slices and minimize waste.
When slicing long, cylindrical vegetables like carrots or cucumbers, it’s often best to slice them lengthwise first to create a stable base. Then, place the flat side down and slice across to create even rounds.
To create julienne or matchstick cuts, start by slicing the food item lengthwise into thin, uniform planks. Stack the planks together and slice across to create thin strips.

Slicing Different Types of Food
Fruits and Vegetables
Mandoline slicers are especially useful for slicing a variety of fruits and vegetables quickly and efficiently. Here are some tips for slicing common fruits and vegetables:
Potatoes: For perfectly thin and uniform potato slices, use a mandoline slicer on the thinnest setting. These slices are ideal for making potato chips or gratin.
Cucumbers: With a mandoline slicer, you can effortlessly slice cucumbers to your desired thickness for salads or pickling. Use a medium setting for optimal results.
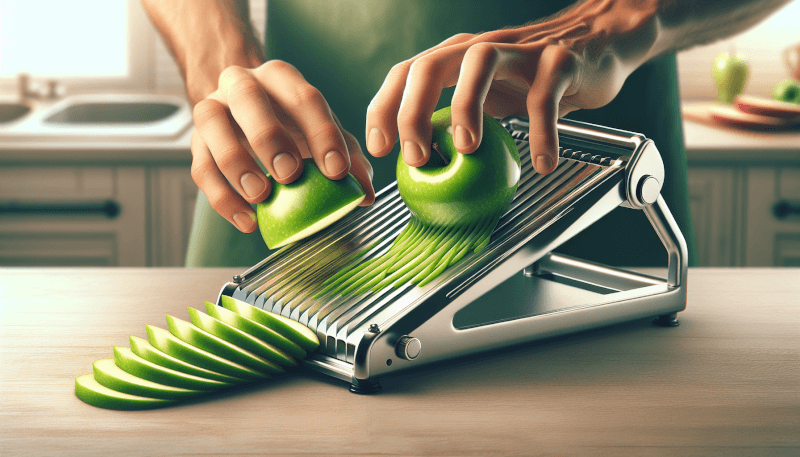
Apples: Whether you’re making apple chips or adding slices to a tart, a mandoline slicer can create paper-thin apple slices with ease. Choose a medium to thin setting for best results.
Soft Meats
In addition to fruits and vegetables, mandoline slicers can also be used to slice soft meats. Here are some tips for slicing soft meats:
Delicate Meats: For tender meats like roast beef or prosciutto, use a mandoline slicer on a thinner setting to achieve thin, delicate slices. These slices are perfect for sandwiches or antipasto platters.
Charcuterie: When preparing a charcuterie board, a mandoline slicer is an excellent tool for slicing cured meats like salami or chorizo. Use a slightly thicker setting for meat slices with some bite.
Hard Cheeses
Mandoline slicers are also great for slicing hard cheeses into various thicknesses. Here’s how to slice hard cheeses with precision:
Cheddar and Gouda: Set the mandoline slicer to a medium-thin setting to create perfect slices of cheddar or gouda cheese for sandwiches or cheese boards.
Parmesan: To grate or create thin shavings of Parmesan, use a mandoline slicer on the thinnest setting to achieve delicate, flavorful cheese ribbons.
Cleaning and Maintenance
Disassembling the Slicer
Proper cleaning and maintenance of your mandoline slicer are essential to ensure its longevity and functionality. Follow these steps to disassemble the slicer for cleaning:
Remove the handguard or food holder from the slicer, if applicable.
Check the slicer for any release levers or buttons that allow you to detach the blade and platform from the main body of the slicer.
Carefully release the blade from its attachment point, ensuring that you follow the manufacturer’s instructions to prevent any damage or injury.
Cleaning the Blades
Cleaning the blades of your mandoline slicer is crucial to remove any food residue and maintain their sharpness. Follow these tips for cleaning the blades:
Use a brush with firm bristles, such as a toothbrush or vegetable brush, to gently scrub the blades. Make sure to remove any food debris from both sides of the blade.
If the blades are dishwasher-safe, you can place them in the dishwasher. However, always double-check the manufacturer’s instructions, as some blades may require handwashing to maintain their quality.
Be cautious when cleaning the blades to avoid accidental cuts. Consider using cut-resistant gloves or handling the blades with extreme caution.
Storing Properly
When not in use, it’s important to store your mandoline slicer properly to prevent damage and maintain its functionality. Follow these tips for safe and efficient storage:
Clean and thoroughly dry your mandoline slicer before storing it. Moisture can lead to rust or damage to the blades.
If your slicer has detachable parts, store them separately to prevent any accidental damage.
Consider using a protective sleeve or cover for the blades to prevent any accidental cuts when retrieving or handling the slicer.

Troubleshooting Common Issues
Uneven Slices
If you’re experiencing issues with uneven slicing, there are a few potential causes and solutions:
Blade Dulling: Over time, the blades of your mandoline slicer may dull, resulting in uneven slices. Sharpen or replace the blades as needed to ensure consistent slicing.
Inconsistent Pressure: Ensure that you are applying consistent pressure when sliding the food item along the platform. Avoid pushing or forcing the food through the slicer, as this can lead to uneven slices.
Food Stuck in Blades
Food getting stuck in the blades can be frustrating, but it can be resolved with the following steps:
Clean as You Go: If you notice food getting stuck during slicing, pause and clean out any debris or residue in the blades with a brush. Clearing away any stuck food will help prevent further clogging.
Adjust Slicing Thickness: If food is frequently getting stuck, try adjusting the thickness setting. Sometimes thicker slices can prevent food from getting trapped in the blades.
Blade Dulling
Dull blades can affect the quality of your slices and increase the risk of accidents. To prevent blade dulling, follow these tips:
Avoid Cutting on Hard Surfaces: Using your mandoline slicer directly on hard surfaces like countertops can dull the blades. Consider placing a cutting board or protective mat underneath the slicer to minimize blade wear.
Regularly Sharpen Blades: Depending on the frequency of use, it’s important to regularly sharpen your mandoline slicer blades. Follow the manufacturer’s instructions for sharpening or consult a professional knife sharpener.
Safety Precautions
Using the Hand Guard
The handguard or food holder provided with your mandoline slicer is essential for hand safety. Always use it to protect your fingers from the sharp blade. Follow these tips for using the handguard effectively:
Secure Grip: Hold the handguard firmly, ensuring that it covers most of your fingers. This will provide a secure grip and prevent accidental contact with the blade.
Proper Placement: Position the handguard against the food item, ensuring that it is in contact with the surface you are slicing. This will provide stability and guide the food along the blade.
Proper Hand Placement
Knowing where to place your hands while using a mandoline slicer is crucial for safety. Follow these guidelines for proper hand placement:
Non-Dominant Hand: Use your non-dominant hand to hold the handguard securely. Ensure that your fingers are curled under and away from the blade.
Dominant Hand: Firmly grip the food item with your dominant hand. Keep your fingers away from the blade by positioning them on top of the food and away from the cutting edge.
Avoiding Direct Blade Contact
Direct contact with the blade of a mandoline slicer can lead to serious injuries. Follow these tips to avoid direct blade contact:
Use the Handguard: Always use the handguard provided with the slicer to create a barrier between your fingers and the blade. The handguard will guide the food along the blade and protect your hands.
Avoid Overreaching: Be cautious when slicing smaller food items or when reaching the end of a larger piece. Overreaching or extending your hand too far can increase the risk of accidental contact with the blade.

Recipes and Inspiration
Cucumber Salad
Ingredients:
- 2 large cucumbers
- 1/4 cup sliced red onion
- 2 tablespoons rice vinegar
- 1 tablespoon sugar
- 1 teaspoon toasted sesame oil
- 1/2 teaspoon salt
- 1/4 teaspoon red pepper flakes
- Fresh cilantro leaves for garnish
Instructions:
- Use your mandoline slicer to thinly slice the cucumbers into rounds.
- In a mixing bowl, combine the sliced cucumbers, red onion, rice vinegar, sugar, toasted sesame oil, salt, and red pepper flakes.
- Toss everything together until well combined and the cucumbers are evenly coated in the dressing.
- Allow the salad to marinate in the refrigerator for at least 30 minutes to let the flavors meld together.
- Before serving, garnish with fresh cilantro leaves for added freshness and flavor.
Potato Gratin
Ingredients:
- 2 pounds russet potatoes
- 2 cups heavy cream
- 2 cloves garlic, minced
- 1 teaspoon thyme leaves
- 1 teaspoon salt
- 1/2 teaspoon black pepper
- 1 cup shredded Gruyere cheese
- 1/4 cup grated Parmesan cheese
Instructions:
- Preheat your oven to 375°F (190°C) and grease a baking dish.
- Use your mandoline slicer to slice the potatoes into thin, even rounds.
- In a saucepan, heat the heavy cream, minced garlic, thyme leaves, salt, and black pepper over medium heat until it starts to simmer. Remove from heat.
- Layer half of the sliced potatoes in the greased baking dish, overlapping each slice slightly. Pour half of the cream mixture over the potatoes, making sure it covers all the slices.
- Sprinkle half of the shredded Gruyere cheese over the cream mixture.
- Repeat the layering process with the remaining sliced potatoes, cream mixture, and shredded Gruyere cheese.
- Sprinkle the grated Parmesan cheese over the top layer.
- Cover the baking dish with aluminum foil and bake for 30 minutes.
- Remove the foil and bake for an additional 25-30 minutes or until the potatoes are tender and the top is golden brown and bubbly.
- Let the potato gratin rest for a few minutes before serving to allow the flavors to settle.
Zucchini Chips
Ingredients:
- 2 medium zucchinis
- 2 tablespoons olive oil
- 1 teaspoon paprika
- 1/2 teaspoon garlic powder
- 1/2 teaspoon salt
- 1/4 teaspoon black pepper
Instructions:
- Preheat your oven to 425°F (220°C) and line a baking sheet with parchment paper.
- Use your mandoline slicer to slice the zucchinis into thin rounds.
- In a mixing bowl, toss the zucchini slices with olive oil, paprika, garlic powder, salt, and black pepper until evenly coated.
- Arrange the seasoned zucchini slices in a single layer on the prepared baking sheet.
- Bake for 15-20 minutes or until golden and crispy, flipping the chips halfway through the baking time for even crispness.
- Remove from the oven and let the zucchini chips cool slightly before serving. They will become even crispier as they cool.
Alternatives to a Mandoline Slicer
While a mandoline slicer offers convenience and precision, there are alternative tools you can use for slicing. Here are a few options:
Knife and Cutting Board
Using a sharp chef’s knife and a stable cutting board is a common alternative to a mandoline slicer. With proper knife skills, you can achieve consistent slices. However, it requires more practice and precision compared to using a mandoline slicer.
Vegetable Peeler
A vegetable peeler with a blade capable of making julienne cuts can be used to create thin, uniform strips of vegetables. While it may not offer the same versatility as a mandoline slicer, it can still be useful for certain slicing tasks.
Julienne Peeler
A julienne peeler is a tool specifically designed to create thin, julienne-like cuts. It functions similarly to a regular peeler but produces thin strips. A julienne peeler can be a good option if you frequently need to make julienne cuts and don’t want to invest in a mandoline slicer.